How to Screen record on iPhone One feature that has gained a lot of popularity is screen recording. Whether you want to showcase your gaming skills, create a tutorial, or simply capture a memorable moment on your iPhone, knowing how to screen record can be incredibly useful. In this comprehensive guide, we will go through the step-by-step process of screen recording on iPhone in detail and explore some advanced tips to enhance your recording experience.
Table of Contents
Why Screen Recording on iPhone?
Let’s take some time to understand the importance of screen recording on iPhone. As we become increasingly dependent on our smartphones for a variety of tasks, the ability to capture on-screen activities opens up a world of possibilities. Here are some reasons why you might want to master the art of screen recording on your iPhone:
Create engaging tutorials
If you’re a content creator, screen recording allows you to create engaging tutorials for your audience. Whether it’s demonstrating a new app, guiding users through a process, or sharing tips and tricks, screen recording is an effective way to convey information.
Demonstration of gaming skills
Gamers often use screen recording to capture their gameplay and share it with a wider audience. Whether you’re a casual gamer or aspiring to become the next gaming influencer, being able to record your gameplay is a valuable skill.
Troubleshooting and Technical Support
When you encounter an issue with your iPhone or an app, capturing the problem through screen recording can be extremely helpful for tech support. Instead of describing the problem, you can show exactly what is happening on your screen.
Preserve memorable moments
Whether it’s a hilarious conversation in a messaging app, a heart-touching FaceTime call, or an achievement in a game, screen recording allows you to preserve and share these memorable moments. Is. Is.
Now that we understand the importance of screen recording, let’s move on to the practical steps to record screen on iPhone.
Step-by-Step Guide How to Screen Record on iPhone
Step 1: Check Your iOS Version
Before we begin, make sure your iPhone is running iOS 11 or later. Screen recording was introduced as a built-in feature with iOS 11, so make sure your device is updated to access this functionality.

Step 2: Enable Screen Recording in Control Center
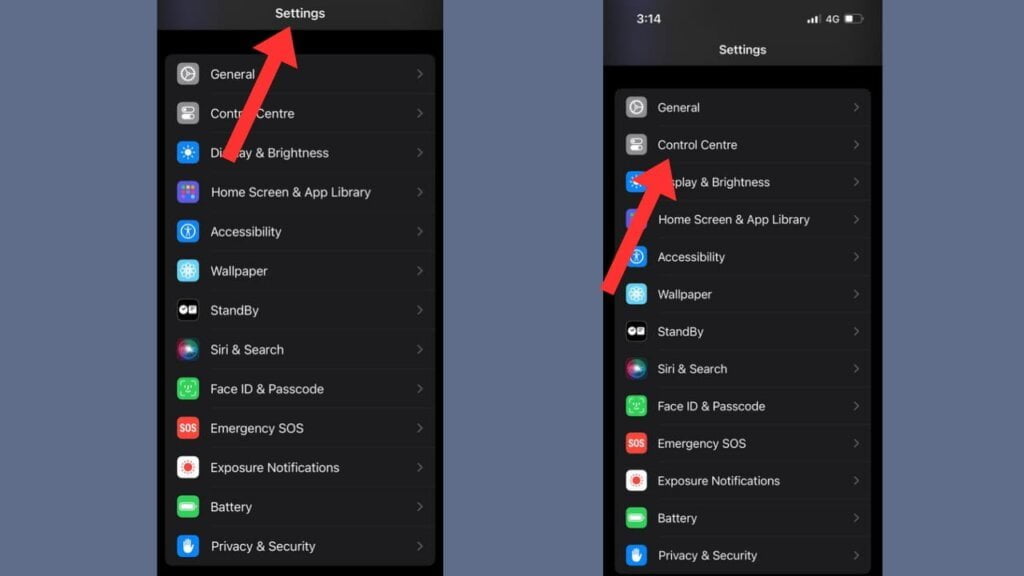
Open the “Settings” app on your iPhone.
Scroll down and tap “Control Center.”
Select “Customize Controls.”
From the list of available controls, locate “Screen Recording” and press the green + button next to it. This adds a screen recording icon to your Control Center.
Step 3: Access Control Center
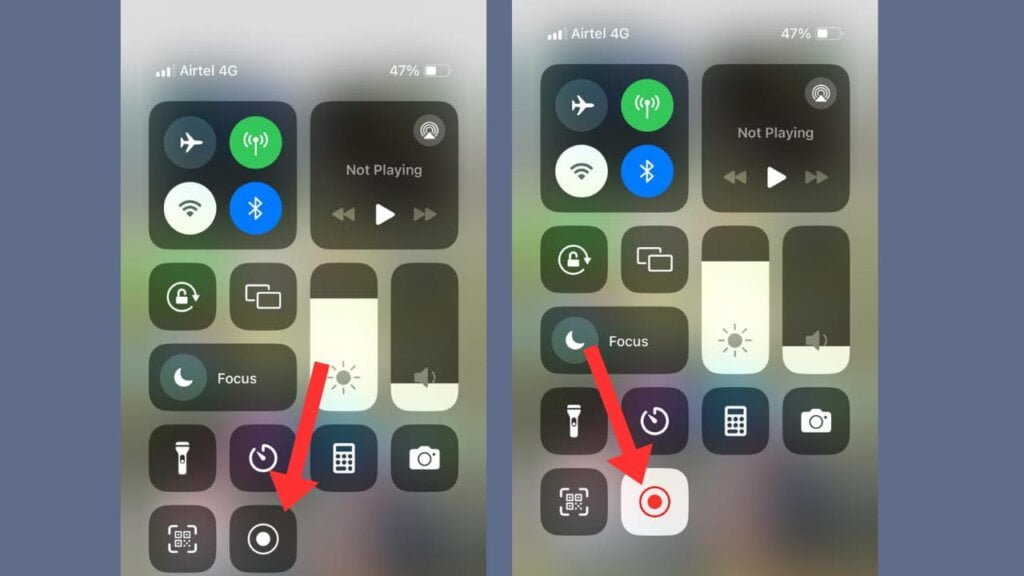
Swipe down from the top-right corner of your iPhone screen (or swipe up, depending on your iPhone model) to open Control Center.

Step 4: Start Screen Recording
In Control Center, find the Screen Recording icon, which looks like a circle surrounded by a ring.
Tap the screen recording icon. A three-second countdown will begin, giving you time to navigate to the screen you want to record.
Once the countdown ends, the status bar at the top of your screen will turn red, indicating that recording is in progress.
Step 5: Stop Screen Recording
Tap the red status bar at the top of your screen to end recording. A prompt will appear asking if you want to stop recording; Tap “Wait.”
Step 6: Access the recorded video
Once you stop recording, the video file will be saved to your Photos app. You can find it in the “All Photos” or “Videos” album.
Congratulations! You have successfully recorded your iPhone screen. But there’s more to improve your screen recording experience.
Advanced Tips for Screen Recording on iPhone
1. Record external audio
By default, iPhone screen recording captures system sounds. However, if you want to record external audio, such as your voice or ambient sounds, you can enable the microphone.
Before starting screen recording, long press or 3D Touch the screen recording icon in Control Center.
To begin recording audio, tap the microphone icon.
Now, your iPhone will capture not only on-screen activities but also any external audio.
2. Customize Screen Recording Settings
To customize your screen recording settings, go to the “Settings” app and tap “Camera.” Here, you can adjust settings like video resolution, frame rate, and video compression.
3. Use Markup Tools
While recording the screen, you can use markup tools to draw, highlight, or add text to the screen.
Start screen recording.
Open Control Center and tap the red status bar to access recording controls.
Tap the “Markup” icon (a pen inside a circle) to open the markup tools.
4. Edit recorded videos
After recording, you can edit your video directly in the Photos app. Trim, cut, or add music to your recording to enhance its quality before sharing.
5. Share your recording
Once you are satisfied with your screen recording, you can easily share it with others. Use the Share button in the Photos app to send the video via messaging apps, email, or social media.
conclusion
Ultimately, mastering the art of screen recording on iPhone opens up a world of possibilities for users. Whether you’re a content creator, gamer, or someone who wants to capture and share memorable moments, the built-in screen recording feature is a powerful tool for you.
Frequently Asked Questions (FAQ) about screen recording on iPhone
Q: Can I record the screen on any iPhone model?
A: Yes, screen recording is available on iPhone running iOS 11 or later. If your device is running an older version of iOS, you may need to update it to access this feature.
Q: How do I make my iPhone record screen images?
A: To enable screen recording, go to “Settings”, tap “Control Center”, select “Customize Controls” and add “Screen Recording” to the list. Once added, you can access screen recording from the Control Center.
Q: Can I record external audio while screen recording?
A: Yes, you can record external audio by enabling the microphone. Before starting screen recording, long press or 3D Touch the screen recording icon in Control Center and tap the microphone icon to start audio recording.
Q: Where are recorded videos saved?
A: Recorded videos are saved in the Photos app on your iPhone. You can find them in the “All Photos” or “Videos” albums.
Q: How do I stop screen recording?
A: To stop screen recording, tap the red status bar at the top of your screen. A prompt will appear asking if you want to stop recording; Tap “Wait.”
Q: Can I customize screen recording settings?
A: Yes, you can customize screen recording settings in the “Settings” app under “Camera.” Here, you can adjust the video resolution, frame rate, and video compression.
Q: Are there any editing tools for recorded videos?
A: Yes, you can edit recorded videos directly in the Photos app. Trim, cut, or add music to your recording to enhance its quality before sharing.
Q: How do I use the markup tool while screen recording?
A: When screen recording, open Control Center, tap the red status bar to access recording controls, and tap the “Markup” icon (a pen inside a circle) to use the markup tool.
Q: Can I share my screen recording with others?
A: Absolutely! After recording, use the Share button in the Photos app to send the video via messaging apps, email, or social media.
Q: Is screen recording legal?
A: Generally, screen recording is legal for personal use or non-commercial purposes. However, it is necessary to respect privacy and copyright laws. Be cautious when recording content owned by others and always follow the terms of service of the apps you’re recording.
Q: Are there third-party apps for screen recording on iPhone?
A: While the built-in screen recording feature is robust, there are third-party apps available on the App Store that offer additional features. However, be cautious and make sure the app is reputable and respects your privacy.
Q: Does screen recording affect iPhone performance?
A: Screen recording may have a slight impact on performance, especially on older iPhone models. However, the impact is generally minimal, and newer tools handle screen recording with ease.
How to Screen Record on iPhoneHow to Screen Record on iPhoneHow to Screen Record on iPhoneHow to Screen Record on iPhoneHow to Screen Record on iPhoneHow to Screen Record on iPhoneHow to Screen Record on iPhoneHow to Screen Record on iPhoneHow to Screen Record on iPhoneHow to Screen Record on iPhoneHow to Screen Record on iPhoneHow to Screen Record on iPhone

