How to Deactivate Facebook Messenger and popular messaging app Facebook Messenger has played an important role in facilitating communication. However, there are times when we may feel the need to take a step back from these platforms for a variety of reasons, whether it’s focusing on personal well-being, privacy concerns, or simply reducing digital distractions. If you are looking to disable Facebook Messenger, you have come to the right place. In this comprehensive guide, we’ll walk you through the step-by-step process of disabling Facebook Messenger and regaining control of your online presence.
Table of Contents
Why Disable Facebook Messenger
Before we dive into the deactivation process, let’s explore some common reasons why people choose to deactivate Facebook Messenger:
1. Privacy Concerns:
With growing concerns about data privacy and security breaches, many users are becoming more cautious about the information they share online. Deactivating Facebook Messenger can be a proactive step towards protecting your personal data.
2. Digital detox:
In the age of constant notifications and digital distractions, taking a break from social media platforms like Facebook Messenger can provide a much-needed digital detox. This allows you to focus on real-life conversations and activities without constant online interruptions.
3. Reducing online presence:
Some users prefer to maintain a low online profile or limit their social media presence. Deactivating Facebook Messenger can be a strategic move to achieve this and create a healthy balance between the virtual and real world.

Now, let's move on to the step-by-step guide on how to deactivate Facebook Messenger
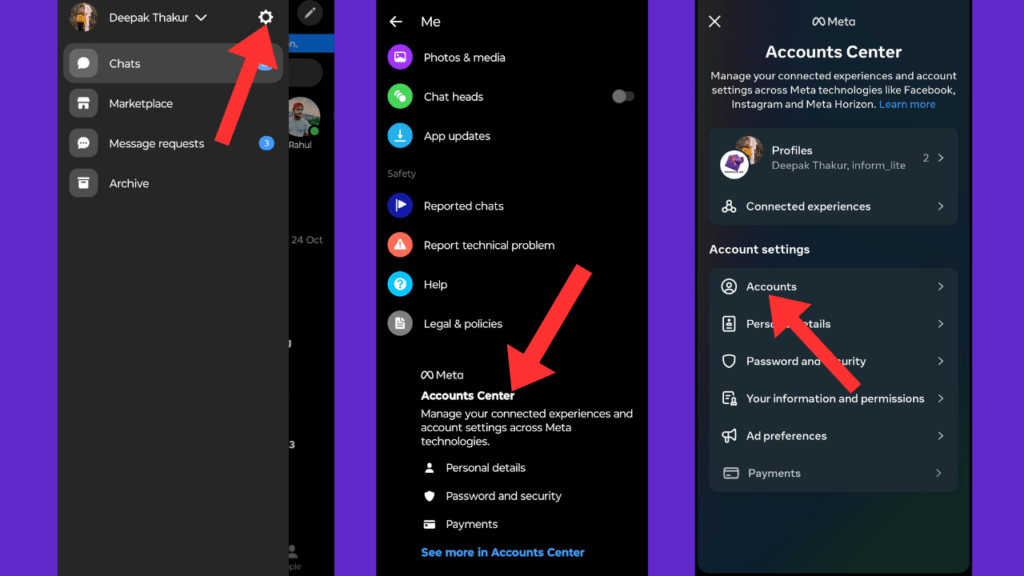
Step 1: Open the Messenger app
First, launch the Facebook Messenger app on your smartphone. Make sure you are logged in to the account you want to deactivate.
Step 2: Access Account Settings
Once inside the Messenger app, find your profile picture in the upper left corner. Tap on it to access the menu. Look for the “Settings” option, usually represented by a gear icon. Tap “Settings” to proceed.
Step 3: Go to Account Settings
Within the Settings menu, you’ll find several options. Find “Account Settings” or a similar option that leads to configuration related to your account.
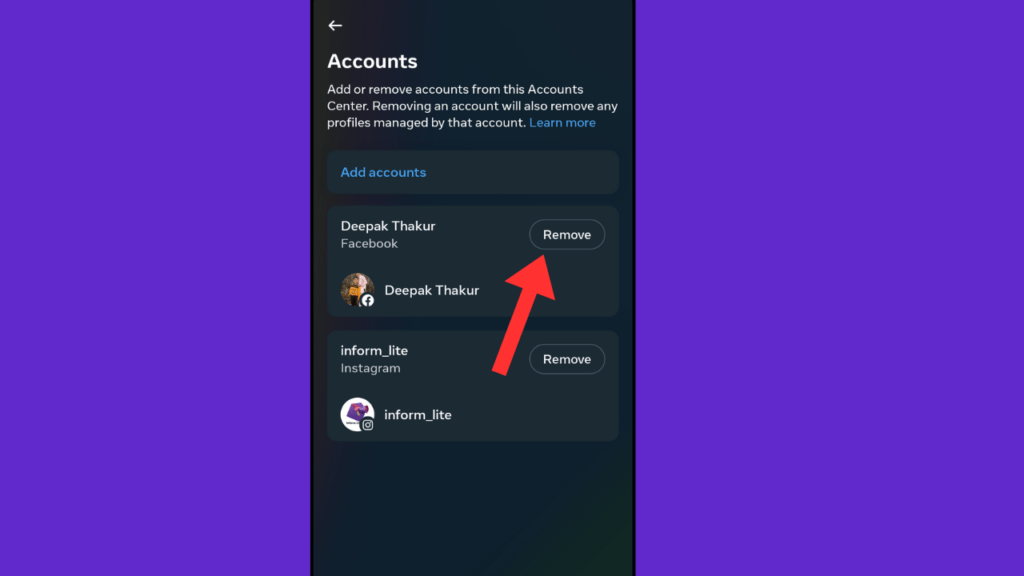
Step 4: Deactivate Your Account
Within the Account Settings, you should find an option related to account deactivation. Facebook may offer some options, such as deactivating your account temporarily or permanently. Choose the option that suits your preferences.
Step 5: Follow the deactivation steps
Once you select the deactivation option, Facebook Messenger will guide you through the deactivation steps. This may include confirming your decision, providing a reason for deactivation, and choosing whether you want to opt-out of future emails from Facebook.
Step 6: Confirm your decision
Before finalizing the deactivation process, Facebook may ask you to confirm your decision. Take some time to review your choice and make sure it is consistent with your intentions. Go ahead and confirm if you’re confident.
Step 7: Log out
After confirming, log out of your Facebook Messenger account. This step ensures that your deactivation settings take effect.

Additional Tips
Notify contacts:
If you want to inform your contacts about your temporary departure from Facebook Messenger, consider posting a status update or contacting close friends and family separately.
Manage notifications:
Adjust your device’s notification settings to stop receiving Messenger notifications during your break.
Check third-party apps:
If you’ve used Facebook Messenger to log in to other apps, review and update your login credentials on those platforms.
conclusion
Deactivating Facebook Messenger can be a liberating experience, allowing you to take control of your digital presence and focus on what’s most important to you. Whether it’s for privacy reasons, a temporary break, or a desire to reduce online distractions, following the step-by-step guide outlined above will help you navigate the deactivation process intuitively. Remember, you can always reactivate your account when you’re ready to rejoin the digital sphere. In the meantime, enjoy the benefits of a digital detox and the new freedom that comes with reclaiming your online privacy.
Frequently Asked Questions (FAQ) - Deactivating Facebook Messenger
Q1: How is deactivating Facebook Messenger different from deleting it?
A1: Deactivating Facebook Messenger is a temporary measure that puts your account on hold. Your profile remains intact, and you can reactivate it at any time. Deletion, on the other hand, is a permanent action, in which your account and data are completely removed from the platform.
Q2: Can I still use Facebook if I disable Messenger?
A2: Yes, deactivating Facebook Messenger does not affect your Facebook account. You can still access and use Facebook normally. However, if you want to deactivate your entire Facebook account, that’s a separate process.
Q3: How do I reactivate my Messenger account after deactivating it?
A3: To reactivate your Messenger account, simply log in with your credentials. Your account will be restored with all your previous conversations and settings.
Q4: What happens to my messages and data when I deactivate Messenger?
A4: Your messages and data remain preserved during deactivation. They will be available when you reactivate your account. However, keep in mind that if you choose to delete your account instead of deactivating it, your data will be permanently deleted.
Q5: Can I still receive messages after disabling Messenger?
A5: No, once you deactivate Messenger, you will no longer receive messages. However, your conversations will still be visible to the people you chatted with. They will see that you are currently unavailable on Messenger.
Q6: Is there a way to temporarily deactivate Messenger without affecting my Facebook account?
A6: Yes, you can temporarily deactivate Messenger without affecting your Facebook account. Follow the steps outlined in the guide to choose the deactivation option that suits your needs.
Q7: Can I disable Messenger from my computer?
A7: The steps to deactivate Messenger may vary slightly between computers. Access your Messenger settings through the Facebook website, find the account deactivation option and follow the prompts.
Q8: Will my friends be notified when I deactivate Messenger?
A8: No, Facebook Messenger will no longer send notifications to your friends when you deactivate your account. However, your absence may be noticed when they try to send you a message.
Q9: What happens to group chats when I deactivate Messenger?
A9: If you’re part of a group chat, your name will still be visible, but your messages will not be visible. Group members will be notified that you have deactivated the messenger.
Q10: Can I still use Messenger for calls after disabling it?
A10: No, deactivating Messenger disables both messaging and calling features. If someone tries to call you, they will receive a notification that you are currently unavailable.
Q11: Is there a time limit on how long I can deactivate Messenger?
A11: No, there is no specific time limit for how long you can deactivate Messenger. You can keep it inactive as long as you want. Reactivate it whenever you’re ready.
How to Deactivate Facebook Messenger How to Deactivate Facebook Messenger How to Deactivate Facebook MessengerHow to Deactivate Facebook Messenger How to Deactivate Facebook Messenger How to Deactivate Facebook Messenger How to Deactivate Facebook MessengerHow to Deactivate Facebook MessengerHow to Deactivate Facebook MessengerHow to Deactivate Facebook MessengerHow to Deactivate Facebook Messenger


1 thought on “How to Deactivate Facebook Messenger: Reclaiming Your Privacy and Peace of Mind”